This guide was written in partnership with mHabitat and is based on the knowledge and experience we have developed working together to deliver webinars. As such this guide is not definitive or exhaustive, but shares the approach we have found to work best for us.
Skip ahead
Choosing between Zoom Webinar and Zoom Meeting
Meetings; Webinars; Getting a webinar account
Deciding on content and structure
Audience; Format; Length; Number of panellists; Making it more interactive; Number of elements; Scheduling
Setting up the webinar in Zoom
Top tips before you start; Scheduling your webinar; Additional settings
Key roles
The Host; Co-hosts; Panellists; Chair; Attendee Support; Attendees
Managing bookings
Why use a booking system; Why Eventbrite; Setting up an Eventbrite booking; Describing your event; Other key information to include; Asking the right questions at booking; Considering potential audience reach; Considering GDPR; Creating custom graphics
Promoting your webinar
When to start promoting; Reaching your ideal audience
Sending out Zoom invitations
Inviting panellists; Inviting attendees
Supporting your panellists
How to be a good panellist
Getting ready; Considering your environment; Thinking about equipment; How to share your screen; How to transition between speakers
Supporting your attendees
Managing the webinar on the day
Roles and responsibilities; Managing house keeping; Managing the Q & A; Managing the chat; Managing polls
Recording and sharing webinar content
Recording your webinar; Sharing content after the webinar
Evaluation
Wellbeing
Accessibility
Accessible bookings information; Accessible webinar content; Accessible recordings and shared content; Finding out about your audience’s accessibility needs
A guide to hosting webinars using the Zoom platform.
This guide talks about everything you might need to know or consider when using Zoom to host a webinar. There are many different options when it comes to webinar software platforms but we have chosen to focus on Zoom because it’s a platform many organisations are now somewhat familiar with and, most importantly, its what we use.
Choosing between Zoom Webinar and Zoom meeting
Are you sure you want a webinar? There are subtle but important differences between a webinar and a regular Zoom meeting, and pros and cons to both. It’s important in the first instance to understand the difference between the two and choose the right option for you.
Meetings
Meetings are for connecting a group of people for two-way discussion and collaboration. Meetings are best for group collaboration, team meetings etc. Meetings allow all participants to easily interact and share with each other and the host. Everyone in the meeting can be seen via video and heard via audio but video cameras and microphones can be switched off. Some meetings are available on free Zoom accounts.
Choose a meeting if:
- You want the audience to be able to see and speak to each other at any point.
- You only have access to a free account.
Webinars
Webinars are best for presenting to a large audience where the host wants more control over the experience and audience members are not seen or heard. The focus for webinars is on the presenter or panellists. The audience joins to listen and learn and can ask questions via the chat or Q&A functions. Webinars can have an audience of up to 10,000 people depending on your account, and can be live-streamed over social media to an unlimited audience. Webinars are only available via Webinar accounts and are not available for free.
Choose a webinar if:
- You do not want or need the audience to be able to see or speak to each other.
- You want to reach a large audience.
- You are able to pay for a Webinar account.
Find out more about the difference between webinars and meetings and the key features of each on the Zoom blog.
Getting a webinar account
- To host a webinar you need a Zoom Webinar account
- There is no option for a free webinar
- Accounts can be paid for monthly or annually
- Zoom is a subscription, not a contract, so you can pay monthly and cancel whenever you want.
- You can pay by card or PayPal.
- Prices start at £32 per month for 100 attendees and get more expensive the number of attendees you would like.
- Full price list
- How to purchase a webinar license
Deciding on content and structure
These are some of the things you might want to take into account when decide on the content and structure of your webinar.
Audience
Who is your ideal audience? If you have an idea of who you’re hoping will watch your webinar it will be easier to plan your webinar to meet their needs and expectations, ensuring you have a good number of attendees.
Format
The most common webinar formats are presentation, interview, panel discussion, or a combination of these. Choosing your format is dependent on whether you want the webinar to be one way or interactive. Do you want to give people information or involve your audience in the process?
Length
- When deciding on webinar length and timings keep in mind attention spans and the risk of “Zoom fatigue”. If you have a lot to get through it may seem tempting to organise a long webinar with lots of elements to keep people interested, but this can leave people exhausted and unable to process all the information.
- It’s worth considering that it’s easy for attendees to get bored and distracted, or just switch off all together. If you have a lot of content to cover consider organising a series of short webinars instead.
- Length may also influence who is able to attend your webinar. Think about how much time your ideal attendees would be willing to commit to watching your webinar. If your ideal attendees are likely to have tight schedules or be attending in their own time, a shorter bit more impactful webinar is more likely to attract the right attendees.
Number of panellists
- Involving a series of speakers is a good way to keep your audience engaged and include a variety of voices. But, transitioning between speakers can be clunky and take up time.
- Make sure to include transitions – introducing speakers, switching between presentations, muting and unmuting – into your timings and make sure speakers are well-versed in how to transition so that the process is as smooth as possible.
- If you’re having a Q+A element, keep in mind how long you will need to allow for potentially each panel member to say their bit.
- Having a host to make introductions and manage transitions can help the session run smoothly but, if you’re tight for time, asking each speaker to introduce the speaker after them can cut down on the number of transitions as you won’t need to keep cutting back to the host.
Making it more interactive
The ‘one way’ nature of Zoom webinars doesn’t allow for much interaction from attendees so you might want to consider including a poll or Q&As in order to make the webinar more engaging.
Number of elements
Each additional element – a presentation, a poll, a video – is another transition and another opportunity for there to be a hitch, or for something to not work. To keep the webinar running smoothly and professionally.
Scheduling
Consider who you would like to attend your webinar and when they are likely to be able to attend.
- Keep in mind when your ideal attendees are likely to be busy with their day-to-day work and avoid these times.
- Consider whether there are existing events already organised that might attract a similar audience to yours.
- Avoid public holidays, religious holidays, bank holidays etc
- If your ideal audience tend to have very busy schedules, lunchtime slots often work well for webinars because people can watch a webinar whilst they eat.
- If your ideal audience are volunteers or your webinar isn’t related to their work, an evening or weekend slot may be a better fit.
Setting up the webinar in Zoom
It’s quick and easy to set up a Zoom webinar but it’s important you consider a few things.
Top tips before you start
- Make sure you have a Zoom Webinar account.
- Aim to set up the Zoom Webinar a few days in advance of the event at the latest so you can provide details to panellists and attendees.
- Emailing attendees can be set up within Zoom but we have found it easier to manage bookings and communicate with attendees using Eventbrite.
Scheduling your webinar
- Sign into your Zoom account via the web browser version, not the app.
- Select ‘Webinars’ from the left panel.
- To set up a webinar from scratch, select ‘Schedule a webinar’.
- Fill out the details in the form, taking account of the following settings in particular:
- Topic: this is the title of your webinar
- When: Select a date and time for your webinar.
- Duration: Choose the how long you would like your webinar to last. Don’t worry too much about this – you are allowed to run over if you don’t finish on time.
- Time Zone: By default, Zoom will use the time zone that you set in your Profile. If it says the wrong time zone click on the drop down to select a different one.
- Registration – we’re managing our bookings via Eventbrite so don’t need to ask attendees to register with Zoom, though we will recommend that they have a Zoom account and app to get the most out of the webinar.
- Webinar password – select this to add an extra layer of security. The password will need to be sent to attendees with the webinar link, via Eventbrite.
- Video: Make sure video is switched on for host and panellists. If you chose off panellists won’t be able to turn their video on.
- Audio: Choose to allow participants to call in via Computer Audio or Telephone Audio if you want people without a computer to be able to listen to the webinar.
- Webinar options – ensure ‘Q&A’ and ‘Enable practice session’ are selected for all webinars, unless the Q&A function is not required.
- You may wish to set the webinar to auto-record at this stage too.
- Select ‘Schedule’ to set up the webinar.
Additional settings
There are some settings that can only be changed when once the webinar has been scheduled. You can also amend the basic settings.
To amend a webinar settings:
- Log in to the Zoom web portal
- Select webinars
- Click on the title of your webinar
- Click edit this webinar
The most relevant additional settings to look at are:
- Branding: here you can add a post-event survey link
- Q&A: here you can select how you wish attendees to view the questions posed to panellists under ‘Q&A’.
- Enable practice session: here you can enable a practice session so that your panellists can join the session before attendees
Key webinar roles
There are a number of key roles that need to be filled to make sure your webinar runs smoothly. Each role accesses the webinar via a different link and has different responsibilities and admin privileges.
The Host
- The host has access to the webinar account and schedules the webinar.
- The host has full admin permissions to manage the webinar, panellists, and attendees.
- There can only be one host of a webinar and the role is essential.
- The host can do things like stop and start the webinar, enable a co-host, mute panellists, stop panellists’ video, remove attendees from the webinar etc.
- The host can be seen via video and heard via audio.
Co-hosts
- Co-hosts share many of the controls that hosts have.
- A co-host is not an essential role, but can ease the pressure on the host.
- Co-hosts can be seen via video and hear via audio,
- The host must assign co-hosts.
Panellists
- Panellists are people who will be presenting during the webinar.
- They can be seen via video and heard via audio.
- Panellists can screen share, annotate, etc.
- The host must add panellists.
Attendees
- Attendees are able to view the webinar
- They can interact with the host and the panelists through the Q&A and the chat.
- Attendees must book a place on the webinar via Eventbrite to be sent joining details.
Managing bookings
It is possible to manage attendee registrations through Zoom but we have found it easier to use a booking system like Eventbrite.
Why use a booking system?
There are many benefits to using a booking system to manage your webinar bookings.
Using a booking system allows you to:
- Easily monitor the numbers attending your event
- Monitor the rate of booking, so you know when to promote
- Gather attendees’ contact details
- Monitor and manage who is booking
- Communicate with your audience before and after the event
- manage audience expectations
- Keep your webinar safe and avoid Zoom bombing
- Easily promote the webinar using a single sharable link to editable content
Booking helps you to keep your event safe from being Zoom-bombed, since gathering people attendees’ contact details in advance means you can send your Zoom event details out at the last minute. This is particularly important if you’re using the meeting rather than the webinar function of Zoom, which leaves you more open to being Zoom-bombed.
Why Eventbrite
There are many free booking systems for you to choose from but we chose to use Eventbrite.
Here’s why we like Eventbrite:
- It is a popular platform so most professional people will already have an account making it quick and easy for people to sign up to your webinar.
- It is simple to set up an event and Eventbrite has an excellent help centre with lots of instructions and support available.
- It is easy to customise the look and feel of the listing to fit with your brand
- You have the option to communicate with attendees via the system should you wish.
- It is simple to ensure your booking listing is accessible. Download their guide to accessibility: The Basics of Event Accessibility: How to Create a More Accessible Event
- It makes it easier to promote your event as when you share an Eventbrite event link on social media the event banner will display, making your post look more engaging.
Setting up your event bookings page
Eventbrite is really simple to use and has great tutorials and instructions. One of the benefits of using such a system is that initial set up is essentially filling in a template. You’re forced to include the essential information such as date and time, and follow the step by step process to complete set up. Here’s how to set up an event
Describing your event
It is important that the event description accurately reflects the content of the webinar, who the webinar is aimed at, and what attendees will get from attending. This information helps attendees decide whether they should sign up. A clear description will attract the right people to sign up and help make sure attendees come away satisfied that the webinar has been a good use of their time. Understanding the benefits will also make the attendees more likely to attend, avoiding drop-offs on the day.
The description should be clear, use accessible language, and give potential attendees everything they need to know to make an informed choice over whether they should attend. Like any descriptive text you should use short sentences and paragraphs, and avoid large blocks of text. Break up the text using tools like bullet points.
Here is an example of an event listing
A description should include, as a minimum:
- What will be covered
- Who is contributing
- What format
- Who should attend
- How attendees will benefit from attending
Other key information to include in the listing
Eventbrite gives you the freedom to format your listing in a way that breaks it up into sections, meaning you can include lots of information without risking making the listing overwhelmingly long. Giving as much information as possible at this stage is useful for potential attendees but also means the organiser will likely have fewer enquiries to answer.
Other useful information you might want to include in a listing:
- technical requirements such as the webinar platform and whether attendees will need a webcam or microphone to get the most out of the webinar
- Whether any prior knowledge or understanding is expected of attendees
- Whether attendees will be expected to contribute in anyway or can attend passively
- Whether the session will be recorded and where this will be available
- Any frequently asked questions about the event – add this information as you go along
Asking the right questions at booking
Eventbrite allows you to ask attendees any question at booking, a feature that can be really useful. Here’s how to create custom questions.
Custom questions can allow you to:
- Give you a more accurate picture of who is attending your webinar eg asking which organisation each attendee is from
- Better understand and meet the accessibility needs of attendees eg asking if they have any additional needs
- Better meet audience expectations in terms of webinar content eg asking about existing knowledge
- Have the audience feed into the development of content eg allowing people to submit questions in advance
- Ask for permissions eg to share information between organisations
- Limit who can attend eg see considering potential audience reach
Considering potential audience reach
Keep in mind that moving to digital platforms and running events as webinars has opened up your content to a potential global audience. If your webinar has a limited capacity you may want to put some restrictions on who can attend in order for spaces to be kept free for attendees in a particular geographical area or from a particular field. There is no formal way to limit who can book via Eventbrite
The best way to manage audience reach is to:
- Promote the event using local channels and forums
- Be clear in the description who can attend eg “a webinar for the Leeds third sector”
- Ask questions at booking that can help you monitor the above eg name of organisation and workplace postcode
- Monitor bookings and periodically contact anyone who might have booked without meeting the requirements and explain why you will be cancelling their booking.
Considering GDPR
Remember that any information gathered at booking is subject to GDPR and should not be otherwise used or shared without permission. This can cause problems if an event is a partnership and partners would like to share attendee details between them. This can be avoided by using the custom questions feature to ask for permissions to use the information gathered.
Questions you might want to ask include:
- Are you happy for all of today’s event partners to be able to get in touch with you?
- Would you like your details to be added to our mailing list?
- Would you like to hear about future events from 100% Digital Leeds and partners?
Creating custom graphics
Eventbrite requires an event header, and creating a good-looking graphic is a great way to make your event look professional. A well designed custom banner will also make your event easier to promote. When you share your event link on social media the banner will be the first thing to catch the eye of potential event attendees.
There are lots of tools you could use to create a graphic but we would recommend using Canva, a free and easy to use web-based design tool. Here are some step-by-step instructions for using Canva to create a custom eventbrite banner.
Promoting your webinar
It is important to have an idea of who your ideal audience is, what they might look for in a webinar, what their schedule is likely to be like, and where they’re likely to see your promotions. Once you’ve worked this out you can consider the following points.
When to start promoting
It’s important to start promoting your webinar with enough lead-in time. Here are some things to consider:
- Try to give your ideal attendees enough time to find out about the webinar and have space in their diary to be able to attend.
- Promoting your webinar too far in advance could risk people forgetting they have booked or losing interest in the content. You know your ideal audience but beginning promotions around a month in advance seems to work for us. Two weeks in advance is generally considered an absolute minimum.
- Don’t worry about every detail of the webinar pinned down before you start promoting – if you have set a date, time, and theme you can start promoting with a ‘save the date’ and fill in the blanks later.
Reaching your ideal audience
Think about where your ideal audience gets their information online and go to them. Consider the following questions:
- Can you contact people directly? If you have a direct mailing list that you have promotion permission for be sure to send out information.
- Do you have any partners that share the same ideal audience as you that would include your event in their communications, such as emails, newsletters, websites?
- Which social media platforms do your ideal audience use? Which hashtags do they follow? Post your link accordingly.
- Who are the influential people or organisations in the circles you’re trying to reach? Tag them in your social media posts and ask them to share or retweet to spread the word to their followers.
- What other forums do your ideal audience use? Take the time to post your event there.
Sending out webinar invites
Inviting panellists
Panellists must be sent unique webinar invitations through the Zoom Web Portal – here’s how
You might also want to send your panellists a follow up email so they know to expect the email from Zoom.
Here is an example email for panellists:
Hi [names of panellists],
You should now have all received a Panellist invitation for our upcoming webinar [name of webinar with link to Eventbrite details], which will take place over Zoom.
Please use those details to log in so that you have panellist privileges on the day. Please don’t share this with anyone – attendees will receive joining details after booking via Eventbrite [link to booking page]. If you lose the invitation let me know and I can send another.
Please log in at [15 minutes before webinar start time] for a practice session, so we can get settled and sort out any last minute issues before the attendees arrive.
To make sure everything goes as smoothly as possible have a look at this checklist on how to be a good panellist .
If there’s anything else I can do to help, just let me know.
Inviting attendees
Attendees should have booked a place on your webinar via your Eventbrite booking page so we recommend communicating with them through Eventbrite.
The webinar login invite information should be sent to attendees one or two days before the webinar. This keeps the login information safe and discourages people from sharing it with people who haven’t booked.
You may also want to send the message again on the day of the webinar, an hour or two before it is scheduled to start, to act as a reminder to people to log on.
Here is an example message for attendees:
Thank you for registering for [insert name of webinar with link to Eventbrite booking page]
Use these details to join the webinar:
Zoom link: [insert link]
Webinar ID: [insert ID, and password if applicable]
Please note:
- This webinar will be recorded.
- [if the event is sold out] There is a waiting list for this webinar so if you are unable to attend please cancel your place so that we can offer it to those waiting.
Taking part in a Zoom webinar:
You can join the Zoom webinar by clicking the meeting link above, or by entering the meeting ID into the Zoom app or web portal.
We encourage you to use the Zoom app on a laptop/desktop computer for the best experience and to ensure you can use all the webinar functions.
More information on how to join a Zoom webinar
We look forward to seeing you there,
Supporting your Panellists
In order for your webinar to run smoothly on the day it is important to give your panellists as much information and support as possible.
In advance of the webinar you should:
- Provide an event schedule: this allow the panellists and speakers to organise themselves.
- Set expectations: make sure panellists know what is expected of them in terms session format, content, presentations etc.
- Provide a panellist guide: you should explain the following: how to share their screen, how to transition, how the session will be managed, how the Q&A will work, set-up checklist. You might want to link them to How to be a good panellist
- Set up a webinar practice session a day before: this allows panellists to test their tech works and ask any last minute questions. Take the time to practice sharing screen, muting and unmuting etc to make transitions go as smoothly as possible.
- Set up a practice session at the start of the webinar: this allows panellists to can join the session before attendees so they can start comfortably and iron out any last minute issues.
How to be a good panellist
A checklist for panellist to make sure everything goes smoothly.
Getting ready
- Install Zoom: please download the Zoom app and access the event through the app. Presenter functions do not work through Browser access.
- Check your privacy settings: If you have a Mac you need to ensure your privacy settings allow Zoom to share screen before the event. System Preferences > Security & Privacy > Privacy > Screen Recording. Check the option for zoom.us
- Turn off your notifications: turn off your notifications and close all non-related tabs.
- Joining the webinar: you will be sent a personalised link to join the Webinar as a panellist. Use this link rather than the general event link for attendees. This ensures you enter with the correct settings. This link is unique to you so please do not share it. If you lose the link let us know and we can resend it.
Considering your environment
- Avoid interruptions: Find a private space where you are unlikely to be interrupted. As a minimum inform anyone in advance who may enter the room that you are planning to be on a video call to minimise interruptions.
- Lighting: Find an area with good lighting and position yourself so that you are looking into the light. Natural light is best. As a minimum try to ensure that any significant light sources are not positioned behind you – this will help with the clarity of your image
- Backdrop: Consider what is on display behind you. A blank wall is best but as a minimum try to avoid mess, too many personal items etc. Alternatively you might want to set up an appropriate virtual background.
- Camera angle: Ensure that your camera height is in line with your eyes so you can look straight forward and into the camera. Avoid having to look up or down. Consider stacking your laptop on top of a pile of books or similar to get the best height.
Thinking about equipment
- Ensure quality audio: If possible use headphones with a microphone to avoid background noises.
- Power up: Make sure your devices are fully charged or plugged in
- Connectivity: Try to ensure you have a strong wifi connection. Consider others who might be using your internet bandwidth with streaming video (Netflix or similar) or online gaming for example. Avoid being logged in to any VPNs. Close any unnecessary applications on your device.
- Use the app: Zoom works best from the app rather than browser version.
- Sharing slides: Different devices have different options for sharing slides. Make sure you’re familiar with how to share slides.
- Test your equipment: Zoom gives you the option to test your camera and audio before you enter a call. Even if you are struggling for time try to take 30 seconds to look at this screen.
How to share your screen
- You will need to select ‘Share Screen’ from the toolbar in Zoom and choose what you want attendees to be able to see.
- You will have the option to share the different windows you have open or your desktop. We recommend selecting the window which includes your slides/content only (e.g. web browser or powerpoint).
- If you choose to share your desktop (e.g. if you have multiple documents), bear in mind that attendees will see everything including your desktop files and notifications you receive.
- You can only share one screen at a time. One thing to bare in mind, if you do try to share a screen whilst someone else is sharing, it will cut the other person off and immediately share yours.
How to transition between speakers
Transitions will be agreed in advance. [you might want to include your event schedule here] When you have finished your section, stop your screen share and mute your audio.
Managing the webinar on the day
Roles and responsibilities
The roles that we think are essential for a webinar is a Host, Chair, and panellists. If you have the capacity you might also want to include an Attendee Support role.
Host
The host joins the webinar as host, using the webinar account. The host is a background technical role and the responsibilities are as follows:
- Start the webinar
- Run practise session
- Share Intro Event slide
- Start Recording (to cloud)
- Start Broadcast
- Support panellists during the session if any tech issues (including mute/unmute support as required)
- Answer technical issues in chat/Q&A
- Time-keeping messages to panellists
- Save Chat
- Close Meeting
Chair
The Chair joins the webinar as a panellist. The Chair is a front-facing presenter role and the responsibilities are as follows:
- Introducing the webinar
- Explaining the housekeeping
- Keeping an eye on timings for panellists
- Managing Q&A session
- Closing remarks
Attendee Support
The Attendee Support person joins the webinar as a panellist. Attendee Support is a front-facing support role and the responsibilities are as follows:
- Supporting attendees with technical issues: monitoring the Chat & Q&A looking for any attendees who need support to access the webinar in any way.
- Ensuring questions and comments are submitted properly: monitoring the Chat and Q&A asking anyone who asks questions to panellists in the chat box to copy and paste their question into Q&A box so they will be seen.
- Save Q&A questions in separate document.
Managing Housekeeping
It is key to have clear housekeeping slides and agenda slides so everyone knows:
- What to expect from the webinar
- The webinar schedule
- How to interact with the panellists
Housekeeping slides can be shared by the Host at the start of the webinar and they should be explained by the Chair.
Here are some example slides:


Managing the Q&A
People can ask questions via the Q+A function at any point during the session and panellists can choose whether or when to answer. Answers can be given as text replies to the original question or answered ‘live’ over video as part of a ‘Q&A’ section. Find out more about using Q+A on the Zoom blog.
To answer questions, select the Q&A icon from the toolbar in Zoom.
- Answer questions out loud during the webinar by clicking ‘Answer Live’. Or you can click ‘Type Answer’ to type out your answer for the attendee.
- There is also an option to dismiss questions and re-open them if needed.
- If running a Q&A section of the webinar the Chair might want to choose appropriate questions submitted via the Q&A and invite panellists to answer on camera in turn.
- The Q&A should be saved at the end of the webinar and the answers to any unanswered emails can be circulated via email after the webinar.
Managing the chat
To view the chat, select the ‘Chat’ icon from the toolbar in Zoom

When sending a message on the chat, as a panellist, you can send a message to all panellists, all attendees and panellists, or an individual.
The attendee support role should keep an eye on the chat to answer any technical queries and ask attendees to transfer any questions for panellists to the Q&A.
The chat should be saved at the end of the webinar if the webinar is recorded .
Managing polls
The polling feature allows you to ask attendees questions and gather responses during the webinar. Questions can be single or multiple choice. You can share the results of the poll during the webinar as well as downloading the results after the webinar in the form of a report.
There are full instructions of how to use polls on the Zoom website.
Recording and sharing webinar content
Recording your webinar
There are two ways to record your webinar so you can share the video afterwards:
Automatic Recording: this starts the recording as soon as your webinar starts. To do this select the auto record function when setting up the webinar. Automatic recording ensures you won’t forget to record the session but means you will record all of the session, including the practice session. This means the recording can look messy and you may need to edit the video before sharing.
Manual Recording: the Host can manually press the record button when you would like to start recording. It’s one more thing for the host to remember but being able to choose when to start recording means you can start the recording when you’re about to start the webinar and void having to edit the video later.
Sharing content after the webinar
Video: can be uploaded to a file storage service like Dropbox, Google Drive, or a streaming service like YouTube or Vimeo. Uploading to a streaming service makes it really easy to embed your video on to your website or share via social media (you usually just have to copy and paste the video’s ‘share’ link). If you upload your video to Youtube it will use speech recognition technology to automatically create captions and translations for your video, making it more accessible.
Q&A: You might want to share the this after the webinar if you didn’t have time to answer the questions on the day or you would generally like to share the Q&A with attendees or the wider public. To do this you would need to manually save the questions and answers during the webinar by copying and pasting them into a Word document.
Chat: If you would like to share the chat or view it at a later date you can select the ‘save chat’ function from the chat panel. If you record the webinar yore chat will automatically save
Slides: There are many platforms available to share slides but you might want to look at Slide Share and Google Slides
Evaluation
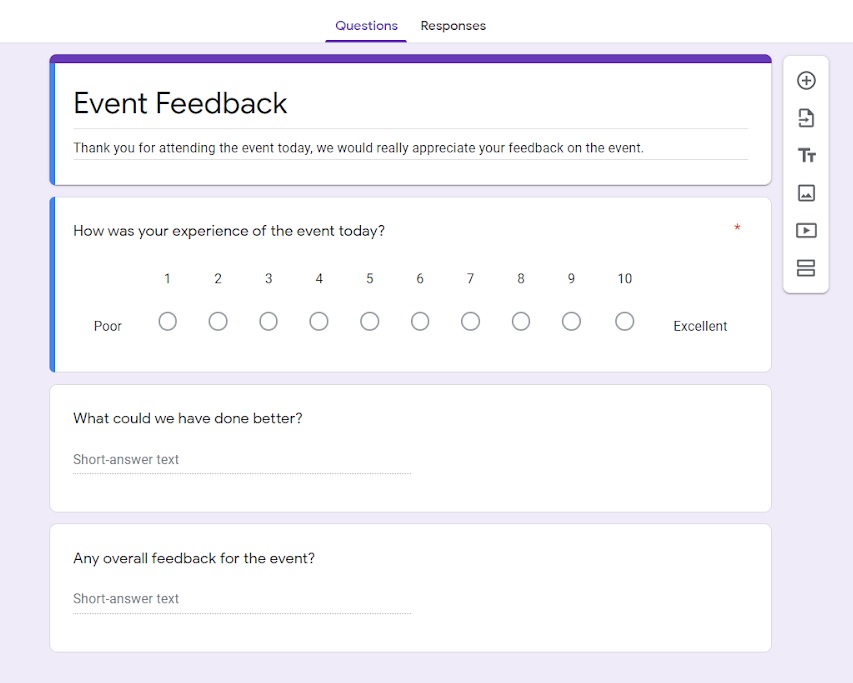
If you would like to get feedback on your event you can create a survey which will appear when the webinar ends. You can also add in a third party survey link outside of Zoom. For example, we used Google Forms.
To add a survey link you will need to:
- Sign in to the Zoom web portal.
- Click the Webinars tab.
- Click the name of the webinar you want to edit the survey settings for.
- Scroll down to the bottom of the page and click Polls/Survey.
- Click + Use a 3rd party survey.
- Enter the link to the survey you want to use (the survey you want to use must be prepared on the 3rd-party service prior to linking for post-webinar use)
- Click Save.
More information on surveys for for Zoom,
Here is an example of our generic survey made using Google Forms :
Wellbeing
Video calls require more focus in comparison to face to face conversations. Non-verbal cues such as facial expressions, body language, tone of voice are what we pay more attention which consumed a lot of energy
For some tips on how to alleviate Zoom fatigue, take a look at the article published by the BBC on the reasons why Zoom calls drain your energy.
Avoiding Zoom Fatigue
- Limit video calls and webinars to those that are necessary.
- Turning on the camera should be optional not necessary.
- Having your screen off to the side, instead of straight ahead, can help your concentration and be less tiring.
- Remember to build in breaks. Leave time to grab a drink and stretch your legs in between meetings and webinars, or at points during long meetings and webinars.
Accessibility
Accessible bookings information
It is simple to ensure your booking listing is accessible. Download Eventbrite guide to accessibility: The Basics of Event Accessibility: How to Create a More Accessible Event
Accessible webinar content
If your panellists are presenting using Powerpoint for Microsoft365 they can turn on the captions and subtitles function to generate automatic captions in the speaker’s language or translated into another.
For more general guidance on how to ensure your meetings and webinars are accessible check out this article from AbilityNet.
Accessible recordings and shared content
Upload your webinar video to YouTube and once the video is fully processed YouTube will include automatic closed captions to support viewers with hearing impairments.
The closed captions are also available in translation, supporting speakers of other languages.
Finding out about your audience’s accessibility needs
You might want to ask attendees about their accessibility needs at the point of booking.
Here are some example questions we have asked before:
Thank you for signing up to this session, we want to ensure our session is as accessible as possible.
Please confirm if you have any accessibility requirements you would like us to be aware of: Yes / No
If Yes, please let us know as we want to take this into consideration during our planning and preparation:
Please provide details:_________________________________
Some examples might include:
- If you use a screen reader and would prefer to receive any presentation in advance
- If you require BSL interpreting
- If you would prefer particular colours within the presentation or a larger font copy in advance
- Other, please state
If you would rather discuss any adjustments you feel would help, please let us know.